
This chapter contains the following topics:
Introduction to Reformatting Account Numbers
Changing Files to New Structure
Restrictions, Warnings, and Ambiguities
Reformatting General Ledger account numbers enables you to change the number, size, and type of segments in your account numbers, and to rearrange the contents of the account number character by character.
You can do this for all accounts at once, or for a range; you might even want to do it for a single account number erroneously assigned.
You can use this feature to change the contents of account numbers without necessarily changing the format of the account number.
All accounts in all files and tables are changed, so that no historical information is lost by doing this. This includes files described as inactive. It does not of course include backup files or exported files.
This feature can only be used, and only appears on the menu, if you have previously authorized it in Company information. If you have not done so, skip this chapter.
Do not Run with Point of Sale or Manufacturing
WARNING: The reformat account number function does not include Point of Sale files / tables or any files / tables from the manufacturing modules. This is because they are used with the main and sub account structure only. The program checks for the presence of Point of Sale Control information and the Inventory Management Control information. If it finds either one, the program will not run.
Potential uses of this feature include, but are not limited to, the following:
| • | Transferring cost center information from the sub-account segment of the account number (used in earlier software versions) to the segments reserved for that purpose in current the Passport Business Solutions software. |
| • | Converting the accounting structure of companies you have acquired so as to comply with your own standard. |
| • | Expanding your account number size to accommodate natural growth. |
| • | Correcting an erroneously-defined account number after transactions have accumulated for it. |
If you are unfamiliar with the variety of account number formats available in Passport Business Solutions, review the Account Number Segments section of the Company Information chapter.
The reformatting process updates the Cross-Reference file, XREFIL, if you choose to create an audit trail of the before and after accounts numbers. Do not confuse this with the similarly-named External Cross-Reference file (EGLFIL), also known as the Accounts Link file.
The Cross-Reference (XREFIL) file contains a single record for each account defined in either the CTL Valid G/L accounts file or the G/L Chart of accounts file. The Valid G/L accounts is used if the Chart of accounts is not available. You cannot add records to, nor delete records from, this file.
The File initialization utility does not apply to the Cross-Reference (XREFIL) file, nor do the regular or extended file utilities, nor the upgrade. This file is generated automatically when it does not exist and Reformat account number is run.
Under the Reformat account numbers menu selection there is an option to print an account number list, which is the contents of this file.
The (EGLFIL), Accounts Link file can be used to store the before and after account numbers.
Synchronization of the Chart of Accounts and Valid G/L Accounts
The next two paragraphs only pertains to you if you have General Ledger installed in your company. If not, skip to the steps below.
Before you run reformat accounts, in G/L, print out the Chart of accounts list report and from the CTL menu run the Valid G/L accounts report. Compare the two. If the lists are not in sync you must make them so. You may do this by entering accounts manually. There are also utilities in G/L, found on the Utility menu, called Set up valid G/L accounts and Set up chart of accounts. There is a Create and Add function for both.
If you decide to run the Set up chart of accounts utility do NOT use the Create function as it replaces all the accounts and defaults many of the fields. If you do, after running it, you will probably have to manually edit many of the fields in each Chart of accounts record.
To reformat account numbers, follow these steps:
|
Step |
Description |
|
1 |
Define your new account format. |
|
2 |
Define which position each character of your old account number structure will occupy in the new account structure. |
|
3 |
Use the Define new account number structure selection to enter the new structure. |
|
4 |
Print the data to check and ensure it is correct, using Print account number list. |
|
5 |
BACK UP YOUR DATA. There is no undo for the next function. If you want to go back to your data before the utility was run, you can only do this by restoring a complete PBS backup. If you have PBS SQL also backup your instance. |
|
6 |
Apply the changes to all data files, using Change all files to new structure. Depending on their size and on the number of packages you have installed, this may take as long as several hours. |
|
7 |
If necessary, use Cost centers / Sub accounts to define new cost centers or a sub account created by the new reformat, or to delete old ones. |
When you perform an account number reformat, you can optionally retain the old account structure in your Account Links file. This allows you to continue using the old account structure when interfacing to non-PBS systems.
Problems may arise when reformatting account numbers at the same time that company consolidation (described in the chapter of that name in the General Ledger User Manual) is in progress.
| • | Reformatting a member company will almost certainly invalidate the consolidation, since the Account Links file is not altered to reflect the change (the file resides with the consolidation company not with any of the members). |
| • | Reformatting the consolidation company does modify the Accounts Link file but may still result in errors, especially if an account number segment has been shortened. |
If you use both functions, print and review the Consolidation Setup Verification Report after reformatting account numbers.
If you reformat your account number so as to increase its length, you may have to review your layouts. All PBS reports accommodate the maximum formatted account number length (seventeen characters), but reports you have created yourself (such as invoices) may expect a shorter account than this and may truncate your new account number.
Before proceeding, make sure you have understood the How Reformat Works section and have read the Restrictions, Warnings, and Ambiguities section.
This selection enables you to tell the system exactly how you want your account numbers reorganized.
Select
Reformat account number from the CTL menu. If the Cross-Reference file does not already exist, there will be a period of processing while it is built. The screen will display Rebuilding XReference File... please wait.
The following menu displays:
Select Define new account number structure.
The following screen displays. This is the first of two screens required to process this selection.
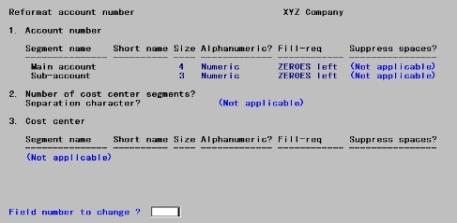
Notice the resemblance to the corresponding screen in Company information. Enter the new account structure in the same manner that you entered the old. Refer to the Account Number Segments section of the Company Information chapter.
The changes that you make here will not take effect now in Company information. They will apply (automatically) when you successfully complete the reformat process (that is, at the end of the Change all files to new structure selection), but not until then.
It is not necessary that the new account structure be any different than the old. For instance, you might wish to change all your main accounts in the range 7000-7999 to 8000-8999 in order to make room for new accounts which you want in the 7000 series. This involves changing the value of numerous account numbers without changing their format.
When the definition for the new account number is complete, press <Enter> at Field number to change ?.
The following screen displays:
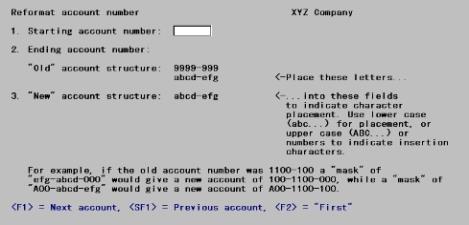
On this screen you will specify which account numbers are to be reformatted and precisely how the old account number format is to be translated to the new account number format.
From this screen you can work with existing entries but not with new ones. The number of entries on the file is fixed. You do not work with individual entries but with ranges.
1. Starting Account number and
2. Ending Account number
Enter the range of account numbers you wish to process.
Options
You may use one of the options:
|
<F1> |
For the next account number on file |
|
<SF1> |
For the previous account number |
|
<F2> |
For the First starting number or Last ending number |
You must account here for all the account numbers which you intend to include when you come to do the Change all files to new structure selection.
However, it is not necessary to account for them all at once. If your requirements are very complex, it may take several executions of this screen to define those requirements completely (especially if you are using insertion characters). You may even have to do so one account at a time.
If you do require several executions of this screen, make sure that the new account structure you specify is the same in each case.
No harm is done if you specify a greater range of account numbers in this selection than you ultimately utilize in the Change all files to new structure selection.
If you are changing the structure of your account number and not merely the contents, you must include every account number. You cannot create a Chart of Accounts with some accounts having a two-segment cost center and some a one-segment one. The system nevertheless does not force you to enter First through Last, because you may require several executions of this screen to define your requirements.
|
Format |
Your current format for account numbers, as defined in Company information |
|
Example |
Press <F2> at each field. |
Old account structure
You do not enter anything into this field. It is there for your information. The program displays a mask of an account number formatted according to your current structure. The mask show X’s for segments defined as alphanumeric, and 9’s for those defined as numeric. Below the mask is a row of lower-case letters (in the range of a through p). Each letter is a tag or label which will be used (in Field #3 below) to reference that character position.
3. New account structure
This field also contains a mask, which this time has been formatted according to your new account structure. Below the mask is a row for you to enter the contents of the new structure. The cursor moves through this row one character at a time.
Restructuring transposes any character position of the original account number to any position of the new account number. Characters can be discarded or even duplicated, and insertion characters may be added at specified character positions.
| • | An insertion character is an uppercase letter or a number, and is inserted exactly as it appears on the screen into every occurrence of the account number. Note that a space is not a valid insertion character. |
| • | A transposition character is one of the lower-case letters from the old account structure, and indicates that the corresponding character of each account is to be moved from the position that letter occupies in the old structure to the position that the same letter occupies in the new structure. |
Consider the following:
Old account number 1100-100
The following mask defines the old Format:
abcd-efg
where the lower case letters abcd represent the characters in the main account segment and efg represent the characters in the sub-account segment.
The second segment was used as a cost center so it must be moved to a cost center segment. The new format requires a sub-account segment set to zeros. The desired new format will require the following mask:
efg-abcd-000
Observe that efg has been moved to the new cost center segment, abcd continues to define the main account segment and 000 forces the sub-account segment to contain zeros.
Using the new mask and the characters from the old account number produces the following result:
New account number 100-1100-000
Study the following table to see other examples. Each example assumes the old account number is 1100-100.
|
New mask |
New account number |
|---|---|
|
abcd-ABC |
1100-ABC |
|
ef-abcd-g |
10-1100-0 |
|
Aefg-abcd-Z |
A100-1100-Z |
|
e-fg-abcd-A00 |
1-00-1100-A00 |
The program will allow you to move a character from a segment defined as alphanumeric to one defined as numeric. You should only do this if you know that the character being moved is in fact numeric. For instance, your old structure might include a three-character sub-account segment which always contains one letter followed by two digits. This segment is necessarily described as alphanumeric. Even so, it would make sense to move the second and / or third character of this segment to a numeric segment of the new account. It would not make sense to move the first character.
You may be aware that account number segments are stored internally as eight characters each, even when the defined size of the segment is less than eight. This has no effect on the lettering scheme. Only the characters actually defined are included in the mask or assigned a lower-case letter. These are the leftmost characters for alphanumeric segments, and the rightmost ones for numeric segments.
Enter the new edit mask.
|
Format |
One character at each position. Data is entered one segment at a time. You may use <Esc> within a segment to cancel that segment and return to the preceding segment. Within a segment you can use <Up> to cancel that character and return to the preceding character. The separator characters are entered automatically as you come to them. |
|
Example |
Type: abcd-gfe |
Field number to change ?
Make any desired change, then press <Enter>. There will be a period of processing as the Cross-Reference file is rebuilt.
If the cost center portion of your New account structure is not exactly the same as the corresponding portion of the Old structure (in both format, size, and content), a screen will appear to warn you of this. What this means is that the reformat process will create new cost centers and/or invalidate old ones. Reformat account numbers does not update the Cost Center file. You will have to do this yourself, after Change all files to new structure has completed. Press any key to continue.
The following message displays as the file is rebuilt:
Rebuilding XReference file . . . Please wait.
When the build of the cross-reference file is complete the cursor returns to the CTL menu.
Note that no accounts have yet changed and only the Cross-Reference file is affected.
This selection lets you review the Cross-reference file before committing to the reformat. PBS strongly recommends that you examine each account. Applying the mask you have defined in the previous section to large numbers of accounts may well have resulted in account numbers you had not anticipated. If so, correct these as described in the previous section and repeat the process.
Select
Reformat account number from the CTL menu. From the menu which displays, select Print account number list.
The following screen displays:
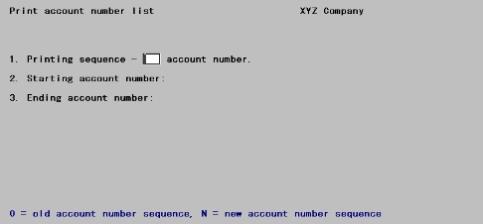
Enter the following information:
1. Printing Sequence - account number
Choose how you want the print list to be sequenced. Enter O to have the print list sequenced by the old account number or enter N to have the print list sequenced by the new account number.
|
Format |
One letter, either O or N |
|
Example |
Type: O |
2. Starting account number and
3. Ending account number
Enter the range of account numbers you wish to include in the report.
Options
You may also use one of the options:
|
<F1> |
For the next account number |
|
<SF1> |
For the previous account number |
|
<F2> |
For the First starting account or Last ending account |
|
Format |
The defined format of either the old or the new account structure (depending on which you requested in Field #1) |
|
Example |
Press <F2> at each field. |
Field number to change ?
Make any desired change, then press <Enter> to print the report. Select a printer as described in the PBS Data Entry Conventions chapter of the System User documentation.
When you are ready to restructure your account numbers in your data files, set aside a large enough block of time to process all the files being restructured and ensure that you have an up-to-date backup of all the files being restructured. All installed packages are updated (but only this company).
Back up your complete PBS system before you run this. There is no undo function.
To increase performance, run this step from a login to PBS on the Windows server and not from a workstation.
Select
Reformat account number from the CTL menu. From the menu which appears, select Change all files to new structure.
The system analyzes the Cross-reference file to ensure that you have not inadvertently created duplicates (for example, by truncating a character position which you mistakenly believed to be always blank). Duplicates a-re checked throughout the file, not just in the range selected.
| • | No two records in the new structure can have the same account number. |
| • | No account in the old structure can have the same number as any account in the new structure. For instance, if you wish to interchange the first and second character of your account number, and two of your accounts happen to be 2463 and 4263, you will encounter this restriction. |
If any duplicates are found, a screen displays that information. Press <Enter> to cancel this selection and return to the menu.
Otherwise, the following screen displays:
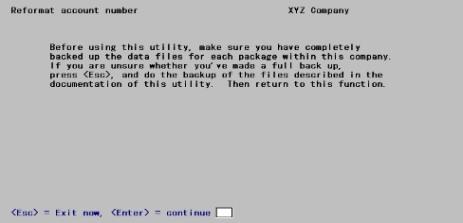
This screen provides a final reminder to make sure all files are backed up.
Press <Esc> to exit if you have not performed your backup or press <Enter> to continue the restructuring process.
The following screen continues the process:
Enter the following information:
1. Starting account number and
2. Ending account number
Enter the range of account numbers you wish to include in the report.
Options
You may also use one of the options:
|
<F1> |
For the next account number |
|
<SF1> |
For the previous account number |
|
<F2> |
For the First starting account or Last ending account |
It is to your advantage to define the minimum range needed to enclose the desired accounts, since this affects the processing time. It is essential that you do not include any account in this range for which you have not previously defined the reformat mask in Define new account number structure.
|
Format |
The defined format of either the old or the new account structure (depending on which you requested in Field #1) |
|
Example |
Press <F2> at each field. |
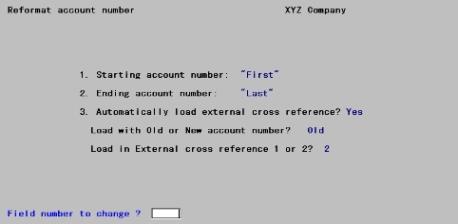
3. Automatically load external cross-reference?
This field does not appear if you have not authorized the External Cross-Reference feature in Company information.
Otherwise, your old structure is automatically saved as the previous account in the External Cross-reference file (EGLFIL). You can also save either the old or the new account number in either of the two external cross-reference fields of that file.
If you are restructuring your entire Chart of Accounts, Passport Software advises that you store your old structure in one of the two external file structures. This is especially advisable if the reformat is done following an upgrade. The effect is to put your old structure in two different places (since the previous account is always saved).
If you subsequently run a partial reformat to correct an error in one or two accounts, you can answer N to Field #3. This means that the chosen external account number field will still preserve your pre-upgrade account structure, while at the same time the previous account number field will reflect whatever the structure was previous to the most recent reformatting.
Do not assume that you can prevent the previous Account from being overlaid by going into Company information and temporarily disabling the External Cross-Reference feature. This will prevent EGLFIL from being processed at all, so that not even the current Account field will be correct.
Enter Y if you wish to load one of the external cross-reference fields with either the old or the new account structure.
|
Format |
One letter, either Y or N |
|
Example |
Type: Y |
Load with Old or New account number?
This field only appears if you answered Y to the preceding.
Enter O to specify the old number is the one to be saved, or N to specify that the new number be saved.
|
Format |
One letter, either O or N |
|
Example |
Type: O |
Load in External cross-reference 1 or 2?
This field only appears if you answered Y to Field #3.
Enter 1 to save the number in External cross-reference field 1, or 2 to save the number in External cross-reference field 2.
|
Format |
One digit, either 1 or 2 |
|
Example |
Type: 2 |
Make any desired change, then press <Enter>. No report is printed, but a running display of the files and records being changed occurs.
Once this process starts, it must run to completion. If it is terminated before completion, some files will have been converted to the new account number and some will remain with the old account number. The only reliable way to recover from that state is to restore from your backup and start over.
When all files are processed:
| • | Company information is updated with your newly defined account number structure. |
| • | The Cross-reference file is initialized so as to be ready for your next reformat. |
Reformat Accounts Invalid Accounts Report and Reformat Log File
The data in the Reformat Accounts Invalid Accounts Report and Reformat Log file (RFRMAT01.LOG - located in the top-level PBS) are very similar. You may use either one to understand which accounts were invalid.
If there were some existing invalid account numbers the Reformat Accounts Invalid Accounts report will print this information. For example, if there is an account number that is found that does not exist in the Chart of accounts or the Valid G/L accounts this is considered an invalid account.
The report prints the original account number, the actual number as it appears in the data, the program that tried to convert it and the name of the field. In most cases the report will point out the problems. However the program will delete certain records if the account number is incomplete.
You have two options when invalid account data is found:
| • | You may export the data files and look for the invalid account, change it in the export file to a valid account and restore it. If you have SQL you can write a script to find the invalid account and change it in the SQL table. |
| • | You can ignore the invalid account number(s) if you feel they are not having a negative affect on your system. The actual affect is difficult to determine. You will have to be the judge of that. If you are not sure do the previous option. |
This section explains the inherent limitations in the reformatting process.
The reformat account number function does not include Point of Sale files or any files from the manufacturing modules. This is because they can only be used with the main and sub account structure only.
| • | Abstain from any maintenance to either the Chart of Accounts or to the Valid G/L Accounts from the time you first define the new account structure until you have completed converting all the data. |
| • | During execution of the Change all data to new structure selection, avoid using the company that is being changed. If you edit a file that has an account number, the reformat would fail. |
| • | Since reformatting can thoroughly reshuffle the sequence of records, if you have a Vision system is a good thing to reorganize the files afterward using Extended File Utilities. |
| • | Backing up the your system before reformatting is highly recommended. This means backing up the data files and if using SQL, also backing up the instance where PBS is installed. |
| • | Do not attempt to save time by doing some packages on one computer and some on another. You may however run different companies on different machines at the same time. |
| • | If you are going to transpose account numbers using the same account number, you should do this in multiple passes. For example, you want to move existing account 1020 to existing account 1030, and existing account 1030 to new account 1040. If you were to do this in one reformat operation, both accounts would end up in 1040. To accomplish this correctly, you should first reformat 1030 to 1040. Next you should reformat 1020 to 1030. |
| • | If you are using Account links to interface with an external system, like NCR Counterpoint, rerun the account links after the conversion. |
| • | Run the reformat from the server and not a workstation. This will increase performance and eliminate any potential network communication errors that can occur between the server and workstation. |
| • | There are several factors that determine how long the reformat will take; like the number of modules installed, the number of records in each file, the server performance specifications, the network performance, other open applications on the server, the number of users logged into the server and more. Allow yourself plenty of time for the reformatting accounts to finish as it can take many hours. Usually, overnight is enough. |
You can inadvertently create error conditions which are not detected by the system but which result in erroneous accounts:
| • | By moving characters from an old segment defined as alphanumeric to a new one defined as numeric, it is possible to create a segment containing invalid data. |
| • | By truncating segments, or by shuffling characters around one position at a time, it is possible to construct a numeric account segment containing nothing but zeroes, or an alphanumeric one containing nothing but spaces. Such segments are valid as cost center segments or as sub-accounts, but not as main account segments. |
| • | By defining different account structures in different ranges of the file (only one of which will be posted to Company information), it is possible to create account numbers which differ from each other only in those positions of the (internal) account number which are not defined as part of the account structure. The resulting accounts are not perceived as duplicates by the system, but display and print identically when formatted. |
| • | Redefining an account structure from numeric to alpha-numeric and using sub-accounts and / or profit centers. You will have to re-enter the sub-accounts or profit centers in Cost center / Sub accounts. Although they may display properly on the screen, the data is not justified correctly in the file. You should initialize the Cost center file, using the system initialization utility, before you re-enter. |
The program does not detect any of these errors, thereby allowing the creation of account numbers that cannot be referenced.
Tildes (~) in the cost center segments serve to indicate that the cost center was to be picked up from the employee record. The reformat process does not recognize these and may convert them incorrectly. If you use this feature, check your Payroll deductions/earnings codes and tax tables after reformatting.
Tildes (~) in the Control information Retained earnings account cost center segments serve to indicate that each cost center has a separate retained earnings account. The reformat process does not recognize these and may convert them incorrectly. Review this field and change as needed.
It may also be necessary to verify Financial statement layouts and Extract financial data layouts to eliminate any unexpected warning messages.
You should review and edit as needed, the Sub account /cost center groups as well.
If you have a consolidation company you must review this setup in the consolidation company and change the consolidation mapped accounts as needed.
Most account numbers in the system contain the full four segments. There are a few cases of degenerate account numbers- that is, fields which contain only one or two segments of the account number. These can be inherently ambiguous. The approach taken is to leave these fields unconverted except where reasonable certainty exists about the user’s intent. Four cases can occur:
| • | Cost centers only (one or two segments) These are mostly the default cost centers which occur in Control information for many package’s. |
| • | Customers may be set up to have a Sub account. Print the customers report and review this data. Modify as needed. |
| • | They are set to blank if either the old or the new account structure does not support cost centers. |
Otherwise:
If the cost center is within the range of accounts specified, the cost center is reformatted as it would be for the first record in XREFIL with that cost center, if there is one. If there is not, the field is set to null (blank or zero as appropriate to each segment).
If not, the field is not converted.
| • | Main and sub-account only These also mainly occur in Control information: the Scrap account, the Default Sales accounts, etc. |
| • | If the old account structure did not use cost centers, there is no ambiguity. Account numbers within the specified range are converted according to the first record on XREFIL for that main and sub-account. This is possible because XREFIL possesses an alternate key on main and sub-account even though ACCTFI does not. |
However, if the old structure did use cost centers, ambiguity is inherent.
Suppose that XREFIL specifies that: AA-BB-1246-000 becomes PP-QQ-1246-020 and that:CC-DD-1246-000 becomes RR-SS-1246-147
Who shall say what becomes of Main / sub-account 1246-000?
If the range of records converted is First through Last, the field is converted. In the example above, 1246-000 would become 1246-020, simply because that would be the first record encountered in XREFIL for that main and sub-account.
Otherwise conversion is not attempted.
| • | Main account only: these chiefly occur in the G/L Financial statements selections and in the Proforma Chart of Accounts. |
Conversion of these fields occurs in the same manner and under the same conditions as the main and sub-account.
| • | Sub-account only: these chiefly occur in the G/L Financial statements selections. |
No conversion is attempted on these.